Arm & Hand Prosthetics
The complete guide from the prosthetic experts at MCOP
Introduction
From surgery to rehabilitation, to occupational and physical therapy, exercise and beyond, our goal is helping you achieve your maximum level of independence.
Decades of intensive experience and access to the latest in prosthetic technology has taught us that successful upper limb surgery and recovery relies on 4 key ingredients: preparation, motivation, expertise, and technology.
Within this guide are general recommendations and information for those facing an upper limb amputation and their families, as well as information on how MCOP supports amputees and their families throughout the entire process. For answers to questions about your unique situation, please reach out to us.
Schedule a chat“My mother has been an amputee for over 40 years and I take care of her health. The men and women at this facility are top notch professionals. I enjoy their spirit, sensitivity, and help with the insurance companies. They have made my mother extremely happy with the process!” – Jesse M.
Did you know? Stats about upper arm amputations
Only between 27%-44% of upper limb amputees use upper arm prosthetics
Our experts have achieved over an 80% acceptance rate with upper limb prosthetics
In the U.S. the ratio of upper limb to lower limb amputation is 1:4.
10% of all U.S. arm amputations are under the age of 21. Source
Please note that while the information provided here is provided from years of experience and trusted sources, almost every case is different. As such, the material provided here is only intended for informational purposes and should not be considered medical advice. Since every person’s presentation or case is different, we recommend an in-person consultation to discuss what options might be best suited to meet your needs.
Always Remember: You Have the Power of Choice
Your choice of prosthetist can have an outsized impact on your journey after an amputation. There are many services available, however, some do a much better job of empowering you and caring for you in the long term than others. The folks that choose MCOP become members of a larger community committed to their ongoing health, happiness, and wellbeing. Choose a prosthetic company that’s invested in your outcomes. Choose to Move Forward with MCOP knowing that you’ll receive:
- The peace of mind of knowing you’re working with prosthetists with the most experience in the country with complex and unique limb loss
- The expert guidance with leading knowledge of the latest prosthetic technologies and activity specific devices
- The empowerment of an in-house gym and shared services with amputee specific physical therapy services
- The comfort of working with people who care
Preparing for an Upper Limb Amputation
If you or a loved one is receiving an upper limb amputation, you should know that a team of expert prosthetists can and should be available to support you, answer your questions, and make sure you get the best care possible. Part of that commitment is making sure you’re prepared for the entire amputation process, which starts with understanding what the experience will be like. Below are some of the different ways you can prepare for a planned amputation surgery.
Pre-amputation questions for your doctor
It’s important to speak with your team of doctors, particularly your surgeon, prior to scheduling any amputation procedure. Common questions might include:
- Risks: What are the major risks to consider with this surgery? What precautions are taken to minimize those risks? Considering the risks, is amputation the best solution?
- Procedure: How long will the surgery take? What kind(s) of anesthesia will be used? What measures are taken to reduce reactions to the anesthesia?
- Pain: What kind of pain should be expected after the surgery? What are the short- and long-term pain management plans?
- Recovery: After the procedure, how long will the patient need to remain in bed? How long in the recovery room? Will there be drains, and if so, when will they be removed? How long will you supervise the patient’s care after surgery? When will the stitches be removed?
Pre-amputation social support
You or your loved one are not the first person to require an arm or hand amputation. As such, consider asking your doctor for support group(s) recommendations or even possible access to patients who have had a similar amputation (but, understand that HIPAA regulations might limit your access). There are several different support groups and resources available to the amputee community. Understanding your options ahead of time can prove beneficial to your physical, emotional, and social well-being pre- and post-amputation.
Pre-amputation consultation with your prosthetic and rehab team
During the pre-amputation consultation, your prosthetic team will meet with you or your family to discuss your activities of daily living, your work, your goals, etc. This is done to determine the best prosthetic approach for you from an understanding of your current lifestyle and what your goals are. You’ll also discuss what it’s like living with an upper extremity prosthetic and the types of prosthetic devices that you may be interested in.
The recommendations based on your vocation, recreational activities, and lifestyle will help guide discussions about how you can expect your life to change after you’ve received your prosthesis. You’ll learn about the available technologies, the benefits and relative weaknesses of different products, and what is the right match for your needs.
Pre-amputation physical therapy
As with any arm and hand amputation procedure, preoperative conditioning can help improve strength and flexibility to the shoulder, core, or other areas surrounding the amputation location. The first step is to arrange a physical therapy session in which you or your family member will be instructed on how to best prepare for your upcoming amputation. Your therapist will show you some specific exercises leading up to the surgery. They can also suggest ways to strengthen other parts of your body like conditioning your non-dominant limb for increased usage if your dominant limb is being removed.
Arm and Hand Amputations
There are several different types of arm and hand amputations and each type of amputation can impact the type of prosthetic device or prosthetic technology you ultimately choose.
What is an upper limb amputation?
An upper limb amputation is the removal of part of the forearm or arm. Amputation of the arms and/or hands can be caused by trauma, infection, birth deformities, and cancer or other diseases.
When and why are upper limb amputations done?
The most common reason for an amputation is poor blood flow, which if left untreated, can cause serious infection and death of tissue. Whether the result of trauma (77% of upper limb amputations are caused by trauma), disease or another reason, amputations are typically done before the affected limb or area poses serious health risks to the patient.
What are the different amputation levels for an upper extremity?
Amputation level is a term that describes the place where a body part is amputated, which is determined by your doctor before the amputation procedure. The amputation level factors into what kind of prosthesis is most suitable for the amputee. Experienced prosthetists are usually consulted to establish what amputation level is most favorable for your future prosthetic device. Depending on the amputation level of your upper limb, arm, hand, and finger, prosthesis options and your ability to use certain prosthetic technologies can vary greatly
Partial finger / partial thumb amputations
When an amputation is limited to anywhere in the finger(s) or thumb of the hand, it’s commonly referred to as a partial finger or partial thumb amputation. It can be any finger amputation or any combination of finger amputations. The thumb is the most critical of all the fingers and requires the most attention for someone to achieve a normal grasp on objects. For a partial finger or partial thumb amputation, the amputation levels could include:
- DIP (Distal Interphalangeal Joint)
- PIP (Proximal Interphalangeal joint)
- MCP (Metacarpal Phalangeal joint)
- Joints of any one or multiple fingers
Metacarpal/transmetacarpal amputation
Metacarpal/transmetacarpal amputation refers to a removal of part of the hand, but not the wrist joint itself. A metacarpal amputation could leave the patient with portions of their hand and fingers still intact and a prosthetic device may or may not be needed. You should always discuss what prosthetics options might be best suited for your specific needs.
Wrist disarticulation
Wrist disarticulation refers to the removal of the entire hand and the wrist joint. With a wrist disarticulation, prosthetic options can vary, but typical prosthetics will have a socket that attaches to a variety of different terminal devices, like a hand(s) or hook(s). Adaptors and other connecting elements are often required. With the addition of high definition silicone gloves coverings, the entire prosthetic system can be disguised, becoming hardly noticeable by others.
Transradial amputation
Transradial amputations are when the amputation level occurs through the radius and ulna of the lower arm, between the elbow and wrist joint. Prosthetic options for transradial amputations can vary tremendously, but typical transradial prostheses will have a custom fabricated socket to intimately fit the residual limb, a forearm section that can contain the electronics and attaches to a terminal device, like a hand or hook. Transradial prosthesis come in many different forms of devices, including passive, body-powered, myoelectric, hybrid systems and activity specific prosthesis.
Elbow disarticulation
Elbow disarticulation is when the amputation level is at the elbow joint, and the lower arm is removed while the entire upper arm (humerus) is maintained. Prosthetics for elbow disarticulation typically consist of a prosthetic elbow joint in addition to a socket (at the wrist) and terminal device(s) (hand) that attaches to the socket.
Transhumeral amputation
Transhumeral amputation is when the amputation level is through the humerus, above the elbow. Prosthetics for transhumeral amputations commonly consist of a prosthetic elbow joint in addition to a socket (at the wrist) and terminal device(s) (hand) that attaches to the socket.
Several prosthetics solutions are available for this level of amputation including passive, body-powered, myoelectric, hybrid systems and activity specific systems.
Shoulder disarticulation
Shoulder disarticulation refers to an amputation where the upper arm bone (humerus) meets the rest of the shoulder at the clavicle and scapula. With a shoulder disarticulation, a prosthetic system consists of a socket for the scapula and clavicle, a prosthetic shoulder joint, a prosthetic elbow joint, a socket at the wrist, and a terminal device (hand). Working closely with a prosthetist who understands the complexity and has experience at fitting this level of amputation is crucial for positive outcomes. Several prosthetics solutions are available for this level of amputation including passive, body-powered, myoelectric, hybrid systems and activity specific systems.
Forequarter amputation
Also known as an “intrascapular thoracic” amputation, the forequarter amputation is when the entire arm and shoulder are removed, as well as the scapula and clavicle. With a forequarter amputation, a prosthetic system consists of a socket for the scapula and clavicle (which could include ribs or upper portions of the trunk), a prosthetic shoulder joint, a prosthetic elbow joint, a socket at the wrist, and a terminal device (hand). Several prosthetics solutions are available for this level of amputation including passive, body-powered, myoelectric, hybrid systems and activity specific systems.
Pediatric Upper Limb Prosthetics
Upper extremity prosthetics for children with congenital conditions or amputations require specialized care and attention. As children with prosthetics grow physically and develop communication skills, they need the support and coordination of pediatric prosthetic specialists. Pediatric prosthetics deliver the best results when combined with consistent monitoring. Your team should work with parents and caregivers to monitor fit, adoption, and other progress markers to make sure the prosthetic system is optimal for your child’s needs.
The MCOP approach
For pediatric congenital amputees, our team has successfully fit myoelectric prosthetic devices on children as young as 1.5 years old. We aim to fit the first passive arm on our pediatric patients around the same time as the child is first able to sit, often referred to as the “fit with sit” approach. Research shows that this is the stage of development when children are old enough to develop the strategies necessary to use an arm prosthetic and when they’re most likely to perceive their prosthetic as a normal and natural extension of themselves.
After an Upper Limb Amputation
Immediately following the amputation of an upper limb, the focus will shift towards recovery and healing of your residual limb. The recovery phase is an important step towards starting your rehabilitation, and eventually, being equipped with an upper limb prosthesis.
Based on the rate of your recovery, your treatment team will determine when you’ve healed enough and when your residual limb is appropriately shaped and conditioned for the rehabilitation stage. Only then can intensive rehabilitation processes safely begin. In rehabilitation, you’ll learn how to properly care for your residual limb and other parts of your body that are crucial to a full recovery. Part of the rehabilitation process also involves being fit with a specially-tailored prosthesis (and possibly an interim prosthesis) and learning how to use it.
What to expect after arm or hand amputation
After your amputation, the healing process begins. It might take a while to fully adjust to life without your limb, but that’s why your treatment team is assembled. They’re there to ensure you make a full recovery and to offer the support you need to get back to your normal life. Early healing is all about proper bandaging, compression and keeping the wound clean. Part of this process is a post-amputation assessment where your residual limb, needs, and insurance options are reviewed to help you determine your best path forward.
In-Hospital Recovery
As with any surgery, in-hospital recovery begins in the recovery room. Immediately following the amputation procedure, you’ll awake from the anesthesia with a drainage tube leading out of your residual limb. This allows blood and fluid to leave the wound and promotes healing.
How long does it take to recover from an arm amputation?
You’re likely to stay in the hospital for around 2 weeks, but your hospital stay is greatly dependent on how your body heals and the type of amputation operation.
In the early stages, it’s also important to maintain proper positioning while in the hospital so your muscles and joints don’t stiffen up and become less useful in the long-term. In fact, many hospitals will recommend that you go against your natural instincts to keep the residual limb in a comfortable, pain-free position, and instead keep it extended as much as possible. Your treatment team might instruct you to avoid elevating the limb for prolonged periods of time, which can also lead to lessened mobility over time.
Bandaging & Compression
Initially, your nurses or therapists will change the bandages regularly and begin showing you how to keep it properly compressed. Compression promotes circulation and reduces the amount of pain caused by pressure from swelling. Elastic bandages are applied and wrapped around the skin / wound area to keep fluids from filling up in your residual limb. Over time, you will slowly compress the wound less and less, especially if you begin using an interim prosthesis. You’ll continue compression therapy until your wound and residual limb are properly shaped and fully healed.
During this process, you may hear some of these bandages and elastic socks referred to as “shrinkers” or “stump shrinkers.” This is a healthcare industry term for the post-amputation compression sleeves.
If reusing elastic bandages, silicone compression sleeves, or similar, then you should clean them regularly with a mild detergent or soap and allow them ample time to dry before reapplying. Before you can wear your prosthesis regularly, you must be fully healed with all fluids and swelling removed from the area.
Skin cleaning & care
The skin around your amputation is important because it will eventually become the primary area in which you mount and control many movements with your prosthetic device. Your therapist will show you how to keep it properly cleaned and moisturized to avoid rough scaly patches of skin. Wash the residual limb with mild soap and water twice a day. Dab it dry and apply a cream. The cream helps keep your limb soft and pliable so it will easily accept a prosthesis.
The skin on the residual limb is also likely to be very sensitive after surgery. To decrease these sensitivities, you use a soft brush or massage ball to brush the scarred skin and sensitive areas as much as you can tolerate it. Depending on your amputation level, the amputation surface area should scar over within 3 to 4 weeks, but the scar won’t be fully healed internally for quite a bit longer.
Post-Amputation Assessment
After the procedure, your team should schedule an initial clinical assessment where you will review your residual limb, your prosthetic needs, and your insurance options to determine your individual best path forward.
Taking Care of the Sound Arm
As you start to adjust to the new physical makeup of your upper body, you’ll begin to rely on your non-amputated limb much more. After all, your remaining arm is now working overtime and should naturally get stronger with the increased usage. Just as you will focus on using your new prosthetic limb, work with your physical therapist to condition the sound arm appropriately through exercise and muscle memory training.
You’ll not only want to start strengthening and conditioning that arm, but you should also take care not to compromise it in any way. If you have an active lifestyle, your prosthesis will help you get back into sports or fitness activities. Talk to your therapist about strategies to get the most out of your prosthesis and ways to avoid injuring or overusing your good arm.
How to Choose an Upper Arm Prosthetic
Prosthetic services can begin as soon as 2 weeks from surgery, depending on the length of the recovery. In some cases, an immediate or early post-operative prosthetic may be most appropriate. Ideally, you should try to begin using the prosthesis within 30 days of surgery, which allows you to more quickly adapt to using the device.
Selecting Based on Lifestyle
The human arm and hand are complex structures, for each amputation level we often recommend multiple terminal devices or multiple prosthetic devices to meet the individual’s needs. We recommend that each individual chooses the best tool for the job or activity in which they are involved in order to have the best possible outcomes.
Types of Arm and Hand Prosthetics
Contrary to what many people think, there are usually many different arm prosthetic options available to upper limb amputees. Depending on a variety of factors (like the level of amputation, your lifestyle, etc.), you have different options of prosthetics specialized for different needs. For example, some prosthetic devices can be customized with different attachments to allow you to continue with your favorite outdoor hobbies, like golf or archery. The important thing to remember is that you have options and should not settle for anything that isn’t right for you.
In many cases, we try to offer multiple prosthetic options. We consider upper limb prostheses as “tools in a toolbox:” each patient has to choose the best tool for the job they are engaged in.
Passive prosthetics
Passive arm prostheses are the best option for people who want their prosthetic to be functional and look more life-like. There are different options for passive prosthesis from moderate cost PVC restorations to silicone passive prostheses that can be made out of different qualities of silicone, either high-definition or low-definition. The high definition silicone passive prosthesis are generally the most desirable passive prostheses. Artists can even painstakingly reproduce and duplicate your natural skin tones in these prostheses. While most offer limited grasping ability and the ability to pre-position the hand, these are primarily chosen for aesthetic purposes and are not as functional as most other options.
In addition to passive hands, some of the latest 3D-printed steel and titanium finger technologies are proving very promising. This includes products from Point Design and Titan Fingers from Partial Hand Solutions, which are great solutions for people with partial finger amputations.
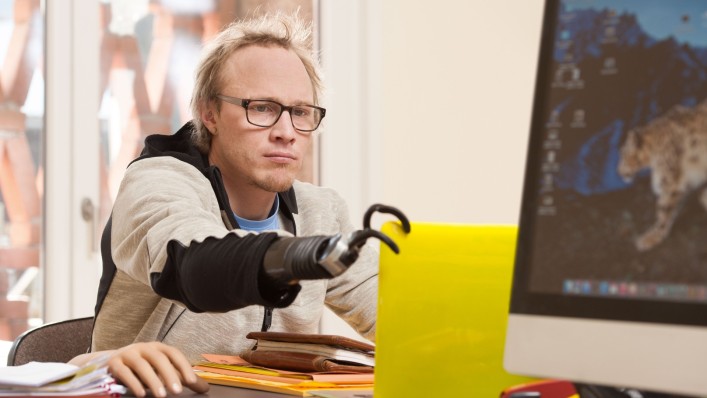
Body-powered prosthetics
Body-powered prosthetics are typically a prosthetic hook or hand that is operated by a combination of the body harness, upper-body muscles and the individual’s sound limb, all connected with a cable. Shifts in the harness and muscle tension pull on the cable, allowing the wearer to open and close the hook or hand. Because of the way these cable-operated prosthetics work, the wearer has the advantage of feeling feedback via the amount of pressure they are applying through the harness and ultimately to the hooks or hands.
The hooks and hands in body-powered prostheses come in two default states: voluntary open and voluntary close, which refer to whether or not the device is open or closed by default. While hands can look more natural, it’s important to consider the advantages that hooks have. For example, hooks are especially useful for bilateral amputees and allow easy access to pockets and bags.
Body-powered hand prosthetic for childrenExternally powered (myoelectric) prosthetics
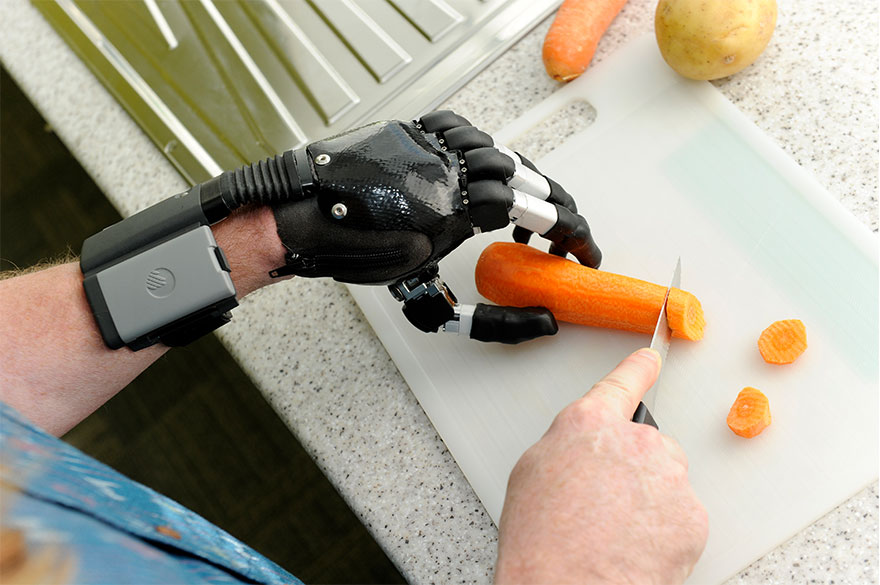
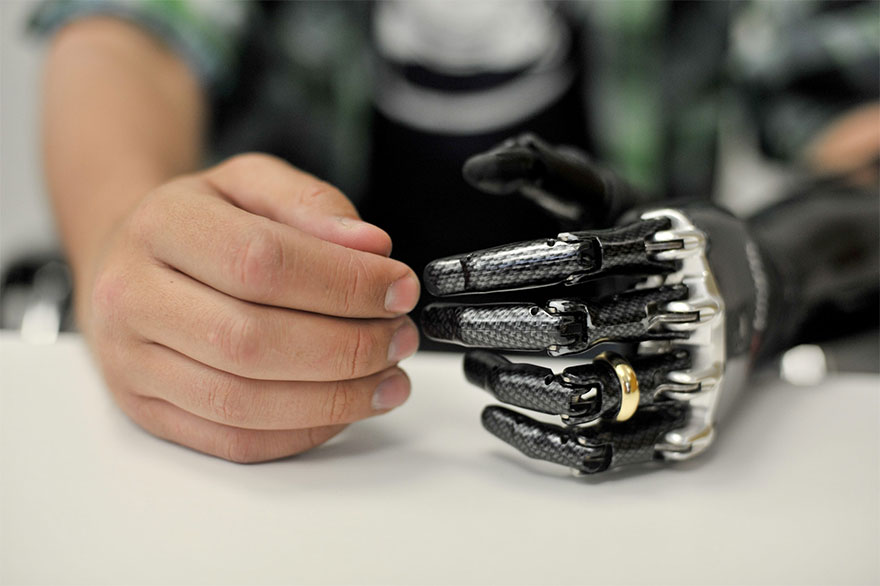
These prosthetics use microprocessors to amplify EMG signals from your muscles, allowing you to control the wrist or hand. The term “myoelectric” is used to describe the electrical impulses in your muscles, which are processed by the prosthetics to allow the wearer a near-natural range of motion. These prosthetics can combine the natural look of passive prosthetics with a high degree of functionality and control and are therefore some of the most popular.
While some of the simpler more robust versions of these devices have high grip strength (oftentimes applying up to 20-30 pounds of force), more advanced multi-articulating versions generally offer slightly less grip strength. Rather than strength, the multi-articulating devices are focused on pre-programmed grasps and in conjunction when used with advanced pattern recognition, which allows myoelectric prosthetics to understand and execute more complex cues than traditional technologies.
Myoelectric prosthetic hand from ÖssurHybrid prosthetics
Hybrid prosthetics combine body-power and myoelectric control to give the user the ability to control the elbow and hand simultaneously. Hybrid prosthetics often combine the high grip force of a myoelectric device with the bio-feedback of body-controlled devices, without extra bulk. This combination can reduce the weight and complexity of the transhumeral prosthetic system while allowing quick operation of the elbow for placement of the terminal device.
Hybrid prosthetic hand from BeBionicActivity-specific prosthetics
These are devices made for a specific activity, like fishing or swimming. In addition to prostheses fabricated for a specific activity, several common activity-specific attachments also exist for a variety of day-to-day tasks such as brushing your teeth, combing your hair, and more. Each activity-specific attachment easily attaches to your existing prosthesis for use with a specific activity. MCOP generally recommends attachments from TRS, Texas Assistive Devices or MidWest Pro-Cad, which offer great products for almost any application.
Activity-specific prosthetic hand
Advanced Prosthetic Research and "Experimental" Technology
These are prosthetic devices on the cutting-edge front of prosthetic technology, relying on the latest smart technology combined with the most advanced materials. These include the below.
Implantable myoelectric sensors
Implantable myoelectric sensors (IMES), are implanted into specific muscles. Each implanted electrode works with unique muscles to allow specific control of the prosthetic hand. These electrodes allow for very fine control of externally powered prosthetics. MCOP prosthetists were the first in the world to work with this advanced technology and we’ve contracted with organizations to continue the research in this innovative area.
The DEKA/LUKE arm
The DEKA/LUKE arm, now manufactured by Mobius, is one of the two prosthetic arms funded through a DARPA initiative for advancing prosthetic technology. The LUKE Arm, which was developed by Dean Kamen the developer of the Segway, is a complex system manufactured by Mobius Bionics. The LUKE arm uses several ways to control the function of the prosthesis. In most cases, the LUKE arm is using advanced gyroscopic sensors to detect directional movement to control the shoulder, elbow, wrist, and hand of the prosthesis.
Modular Prosthetic Limb
The Modular Prosthetic Limb (MPL) developed by Johns Hopkins-Applied Physics Laboratory was also developed under the DARPA advanced prosthetics initiative. The MPL is the most advanced prosthetic device in the world and can replicate all the functions of the human arm. In most cases, the Modular Prosthetic limb uses pattern recognition to control it. The system is being further refined to use with sensory feedback systems to give information from the environment back to the user.
Osseointegrated prosthetics
Osseointegrated prosthetics are prostheses that use intramedullary rodding inserted into the bone and exits the skin and the distal end of the user’s limb. The user directly connects their prosthesis to the titanium device that exits the limb. The user does not use a typical socket with the prosthesis which eliminates any variances in the fitting of the prosthesis. This can be a great solution for patients with hard to fit prosthetic limbs or who have issues with their prosthetic sockets.
HAPTIX (Hand Proprioception and Touch Interfaces)
HAPTIX (Hand Proprioception and Touch Interfaces) send nerve signals back and forth from the terminal device. This technology is the current initiative from DARPA to increase the control of the prosthesis integrating the prosthetic control with the user’s neural system. The systems are designed to send and receive information from the user to the prosthesis and prosthesis to the user. This allows for a more integrated prosthetic system.
Choosing Advanced Prosthetic Systems
MCOP continues to be involved with several research initiatives through many different companies and organizations. We are usually actively recruiting or looking for potential subjects to be involved with upper limb prosthetic research projects. Subjects can often try and give feedback on advanced prosthetic technology before it is available to the general public. Please contact us to learn more about the research we are currently engaged with as these studies are constantly changing as we start and stop new projects.
MCOP works hard to stay at the forefront of the latest in prosthetic technology, but we know that a lot of the above can be overwhelming and sometimes it’s easier to just talk to someone. If you have any questions, please don’t hesitate to reach out.
Living Without an Arm Prosthetic
Another option, of course, is to not wear a prosthetic, which we see in about half of upper extremity amputees. Generally, if people forego a prosthetic it’s due to a bad experience they’ve had with older technology. However, the latest advancements make wearing a prosthetic more attractive than ever. Not only have prosthetics improved dramatically in the last few years, but not wearing a prosthetic has a number of major drawbacks, including:
- Overuse syndromes (carpal tunnel, etc.)
- Reduced function
- Unbalanced movements resulting in back or neck pain
With our modern approaches, over 80% of patients that we fit opt to use a prosthetic.
Weighing Your Options
If you or a loved one is considering an upper limb prosthetic you don’t have to make that decision alone. Your team at MCOP has extensive experience in upper limb prosthetics and we’re always happy to help. If you’re interested in getting expert support and guidance, you can call one of the experts here. When helping you understand your options it’s best to cover a variety of topics so that your team can get to know you better. After that, you can schedule an initial clinical assessment where you’ll have a specialist review your sound limb, current device, and your needs and goals so we can help you build your best path forward.
Upper Arm Prosthetic Insurance & Fitting
Obtaining Insurance Coverage for Your Upper Limb Prosthetic
The next step is to navigate the pathways to obtain insurance coverage for your device. If you have a work-related injury, your team can work with your workmen’s compensation case manager to obtain the best device for your needs. It may be determined that multiple devices are required to allow full function based on your goals. Whether you have private or government insurance, VA, Tricare, or Medicare/Medicaid, most insurance companies offer multiple options for upper extremity prosthetics.
Following this decision, prosthetic insurance experts will work to obtain pre-authorization from your insurance regarding the products that are best suited for your lifestyle. It is also important to have your team check your benefits to make sure that there are no exclusions in your insurance policy.
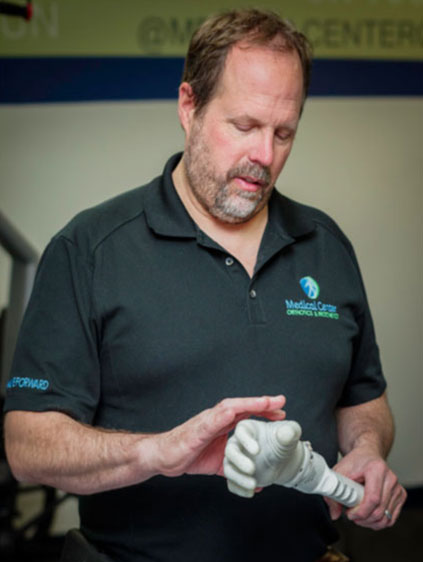
Initial Fitting of Your Prosthetic
Once the pre-authorization has been obtained, your prosthetist will order components and have you in for an impression. For a partial hand restoration, prosthetists use silicone. For higher level amputations, a plaster impression is usually best.
At MCOP, we prefer plaster and physical molds over digital/3D imaging because it allows us to feel and plan for the prosthetic need – sometimes there are differing densities, bony prominences, neuromas, and more, and we find that plaster allows us to create the most comfortable, best fitting socket to meet your needs.
Your team will then create a test or “check” socket for you try to test comfort and range of motion. For myoelectric prostheses, the EMG (electromyograph) sites at this stage will be evaluated to test the strength and intensity of the signal. This is also when a diagnostic setup of the final prosthesis should be created to determine length, alignment, and more. This is important because once the socket is weighted with the device, you may notice a change of fit.
Final Fitting of Your Prosthetic
Once you have a diagnostic setup that is just right, your team will fabricate a definitive, laminated carbon fiber prosthesis. At this stage, your prosthetist would program the upper limb prosthesis to tune the functionality to your needs. They should perform some initial prosthetic training and work with your occupational therapist who will support your long-term training and rehab.
Living With an Upper Arm Prosthetic
After the first fitting, you will have a follow-up 1-2 weeks later. Once you’ve worn the prosthetic for some time, there may be some muscle or limb volume changes, and this meeting is a chance to assess those and discuss your comfort and use of the prosthetic. Additionally, most arm prosthetics require some level of maintenance. After the initial follow-up, we recommend you meet every 3-6 months for routine maintenance and follow-up.
Prosthetic Device Warranties
Each prosthetic component used in the fabrication of your prosthesis has a manufacturer’s warranty, offering different warranty options depending on the manufacturer and the device.
Training & Therapies
Any good prosthetist should ensure you become an expert on using and controlling the device. One of the ways we achieve this is to work in partnership with occupational and physical therapists to set up goals and milestones and help you achieve them through education, physical training, and repetitive exercises. With the proper support, your new limb will feel like a natural extension of your body as much as possible.
Putting on and taking off your arm or hand prosthesis
Your arm or hand prosthesis will undoubtedly become a routine part of your everyday life. Though you may initially need help putting on and/or taking off the prosthesis from your family or friends, a good prosthesis team will teach you how to do this on your own. They will work with you on how to wear it properly and ensure the ideal fit. Your therapy will include instructions on how to put it on so that the surface of your residual limb will not bunch or wrinkle, which can cause skin damage and effect prosthetic fitting.
Your team will also work with you to identify signs of an improper fit, which can lead to blisters and sores. Additionally, you’ll learn how to attach the various pieces of your prosthetic system, how to take it off, how to use and care for any socks or silicone sleeves, and some other basic care instructions to keep your prosthetic limb and necessary accessories functioning optimally.
Using your new prosthetic limb
Once you’re comfortable wearing it, learning to use your new prosthetic arm or hand is the next priority. Your therapists will walk you through basic usage to help gain as much mobility and independence as possible.
You’ll also get taught how to properly care for the prosthesis. Cleaning the surface of the prosthetic, liners, socket, and the socket interior will help you keep the device working properly and avoid possible skin irritations. Keep in mind that each device and each individual varies so your usage training will be based on your unique situation. For example, if your new limb is a myoelectric system, you’ll learn how to charge and/or change the batteries. Some of the more advanced prosthetic devices might take a while to learn, but that’s what your team is for!
Controlling your prosthetic
Depending on the components used in your prosthetic device, your training will teach you how to control a number of important movements, including:
- Opening and closing the terminal device (hand)
- Rotating internally and externally
- Flexing or extending the elbow (higher level amputations)
- Flexing or extending the shoulder (higher level amputations)
With some of the more technologically advanced prosthetic systems, you’ll learn how to control certain movements using various muscles throughout your upper body.
Myoelectric programming
Myoelectric arm and hand prosthetics are controlled by electrical signals by your residual limb. A specialist will help prepare you to move forward with a myoelectric arm or hand by programming the controls and responsiveness. This allows the experts to customize the control to fit your specific needs and lifestyle so you can get the most out of myoelectric prosthetics.
Repetitive drills
Repetitive drills are all about relearning how to do your routine activities naturally, and with confidence, while mastering the controls of your new prosthetic. MCOP trainers might ask you to complete certain tasks several times over again until you’re comfortable and relaxed in doing so. With enough repetition, you’ll be able to make movements (pouring a glass of water, driving the car, picking up small objects, etc.) automatically without thinking about them.
Continued support
At MCOP, you’ll receive ongoing support throughout your journey forward. Among other things, this will include reprogramming and refitting for your upper limb prosthetic. We also have in-house occupational and physical therapists from MedStar National Rehabilitation that help with ongoing physical therapy, but you are welcome to use whichever therapy group you are most comfortable with. We’ll be with you every step of the way to help you move forward.
FAQs and Resources
Our team is happy to answer any questions or address any concerns that you might have. If you’re in need of information not covered by our website, we are happy to speak with you directly. Browse the MCOP blog to read information around trending topics and helpful information to the amputee community.
Frequently Asked Questions
We get questions all the time. Below is a list of some of the most asked-about topics, but if you don’t see what you’re curious about please ask about it here.
How long does it take to recover from an arm amputation?
On average, it can take from one to two months after the surgery to physically recover from an arm amputation. Use of your new prosthetic limb may begin one week after the amputation occurs.
How much does it cost to amputate an arm?
Costs vary depending on your hospital and insurance. Generally, it may cost anywhere between $10,000 and $30,000 or more for a hospital to amputate an arm. If your insurance covers it, you may end up paying between 10-20% of the total, limited by the annual out-of-pocket maximum.
How much does a prosthetic arm or hand cost?
Without insurance, you can expect to pay around $5,000 for a cosmetic prosthetic, up to $10,000 for a functional prosthetic with a hook, and between $20,000 to $100,000 for the latest myoelectric arm technology.
A study by the Department of Veterans Affairs in 2010 gives more detail about myoelectric prosthetics based on the level of limb loss:
- Partial loss of hand: $18,703
- Loss up to the middle of the lower arm: $20, 329
- Loss up to the middle of the upper arm: $59,664
- Loss up to the shoulder: $61,655
Note that these costs are basic estimations. Actual costs are determined by the complexity of the desired prosthetic system. We specialize in gaining insurance coverage for advanced prosthetics like myoelectric arms to help ease the financial burden of a prosthetic limb.
How long does an amputation surgery take?
Most amputations require five to 14 days in the hospital. The length of the operation itself can vary greatly and any complications may extend this timeline.
What are common causes of upper limb amputations?
Upper limb amputations are most commonly caused by trauma. Other common causes are infections, tumors, congenital issues, and extremely poor circulation.
External Resources
We partner will various organizations to provide you with the most complete and thorough list of helpful resources for amputees and their loved ones. Browse through our list of exhaustive resources for amputees, or contact us and we’ll point you in the right direction to get the answers you seek.